Channels
Special Offers & Promotions
Olympus helps to increase reliability and accuracy in optical metrology
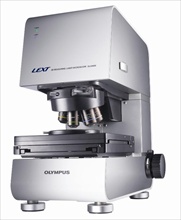
 The Olympus LEXT
OLS4000 is being used for the development of good practice guidelines and
new calibration standards in optical metrology. These reference standards are
being developed by a team led by Professor Richard Leach, Principal Research
Scientist at the National Physical Laboratory (NPL).
Preliminary data, presented by Professor Leach at the 10th
International Symposium on Measurement Technology and Intelligent Instruments
(ISMTII) demonstrated that these calibration standards will help users to
eliminate background noise and data uncertainties, thus increasing reliability
and accuracy. The good practice guide on the calibration of confocal
microscopes will also provide input to the upcoming ISO/WD 25178-607
specification standard, which is currently in development.
The Olympus LEXT
OLS4000 is being used for the development of good practice guidelines and
new calibration standards in optical metrology. These reference standards are
being developed by a team led by Professor Richard Leach, Principal Research
Scientist at the National Physical Laboratory (NPL).
Preliminary data, presented by Professor Leach at the 10th
International Symposium on Measurement Technology and Intelligent Instruments
(ISMTII) demonstrated that these calibration standards will help users to
eliminate background noise and data uncertainties, thus increasing reliability
and accuracy. The good practice guide on the calibration of confocal
microscopes will also provide input to the upcoming ISO/WD 25178-607
specification standard, which is currently in development.As an important component of these calibration standards, Professor Leach's team is defining good practice guidelines using typical examples of: stylus instruments; white light interferometers; focus variation instruments; and confocal microscopes. This project has established robust and easy-to-use calibration steps and reference standards for all the major areal surface measurement instrumentation technologies. As part of this, NPL is developing a box of artefacts (optical flat, step heights, lateral grids, star patterns, sphere on plane, deterministic) to allow calibration in compliance with the latest draft ISO standard. Once finalised, users can implement these to gain a level of confidence in the accuracy and trueness of their resulting data.
The Olympus LEXT OLS4000
Further demonstrating the reliability and accuracy of the LEXT OLS4000, Mr Hitoshi Suzuki, Olympus Corporation, Japan presented his findings on ‘A study of surface measuring limitation on a laser scanning microscope by the examination of response properties of surface texture and slope detection on a ruby sphere sample', at the EUSPEN conference in May. Since identifying and rejecting doubtful measurements is key to maintaining accuracy, instruments need to be able to produce repeatable results. Accuracy when using a CLSM depends on the numerical aperture (NA) of the objective lens; steep slope measurements up to 80º can be accurately obtained with the LEXT OLS4000 when using a 0.95 NA lens.
For more information click here
Media Partners


